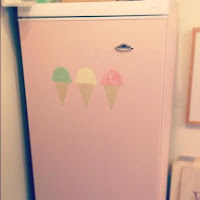
With food on my mind, I'm considering adding a lovely big Ice Cream Cone to my newly painted Fridge Freezer. Yes you read that correctly. I have painted my Fridge Freezer. In fact I have painted the Fridge Freezer, and it is lovely.
I have always wanted a pretty Smeg or a Smeg-a-like, but as our kitchen is the size of most peoples ensuite bathroom, there is no chance. I have a plain Jane 'Kelvinator' sitting in my workroom. She hums away in the corner and keeps things cold. She is bumped, scratched and pretty boring. She is very useful, but could not ever be described as pretty. You can see where this is headed.
I would never offer a service to a client I have not tried and tested myself. So looking at her in her pale and uninteresting light, I thought she deserved a makeover and my clients deserve the opportunity to have 'Mulitcoloured' goods instead of 'White' goods. It's win, win. I should give this a go.
Out came the paint. And the experiment shall begin. If she still looks lovely in a fews months, 'White Good's' will be added to my Kitchen Painting Service. Wonderful.
Now, since you have stuck with me this far, I will even tell you how to do it. But don't go telling everyone OK?
Step 1. Clean off all the grease and gunk. Remove all the kids pictures and magnets and crayon. Allow to dry.
Step 2. Choose your paint colour. Now I only use Annie Sloan Chalk Paint or Autentico Paint. In this instance I went straight for my tin of Annie Sloan Anitoinette. It's pink and girly but not sickly sweet. So a perfect fit for my new look refrigerator.
| Painting a Fridge Freezerr |
Step 4. Leave for 24 hours so the curing process can at least get started. Remember this is a shiny surface, so I don't want to wipe off the paint when I start to wax.
Step 5. Go for it with your wax. I use Annie Sloan Clear Soft Wax, as I find it very easy to work with. You can apply with a brush or with a cloth. Work in 2ft x 2ft blocks, waxing and then wiping. If you want to, apply a second coat later. That's it. Brand, spanking new Fridge Freezer! TaDa. Pat yourself on the back for being so clever. Or have a cup of tea.
Step 6. REMEMBER IT TAKES BETWEEN 21 - 28 DAYS FOR THE WAX TO CURE FULLY HARD so keep the fridge magnet free for 3 weeks. After that you can go crazy!
Want to see a pic? Oh, OK then, (I know rubbish pictures, but the room is tiny!).
| |Close up of the Kelvinator |
| And here she is. Pink Fridge. |
And that, my dear friends, is how to turn boring 'White Goods' into 'I'm here to be seen' beauties!
Let me know if you try it.
M x
UPDATE...
Here are the Ice Cream Cones:
 |
| Ice Cream, Ice Cream, cold & sweet... |
 |
| Ice Cream, Ice Cream, good to eat! |
1 comment:
Ooh, I love this! Hubs has persuaded me to put our old chest freezer, which has been in storage, in a spare corner of our kitchen, since our growing boys are beginning to eat us out of house & home. Practical - yes, but it is an ugly eyesore as far as I am concerned. My brand new pot of Paris Grey may just redeem it! Thanks for the tip xx
Post a Comment